1. Mục tiêu dự án
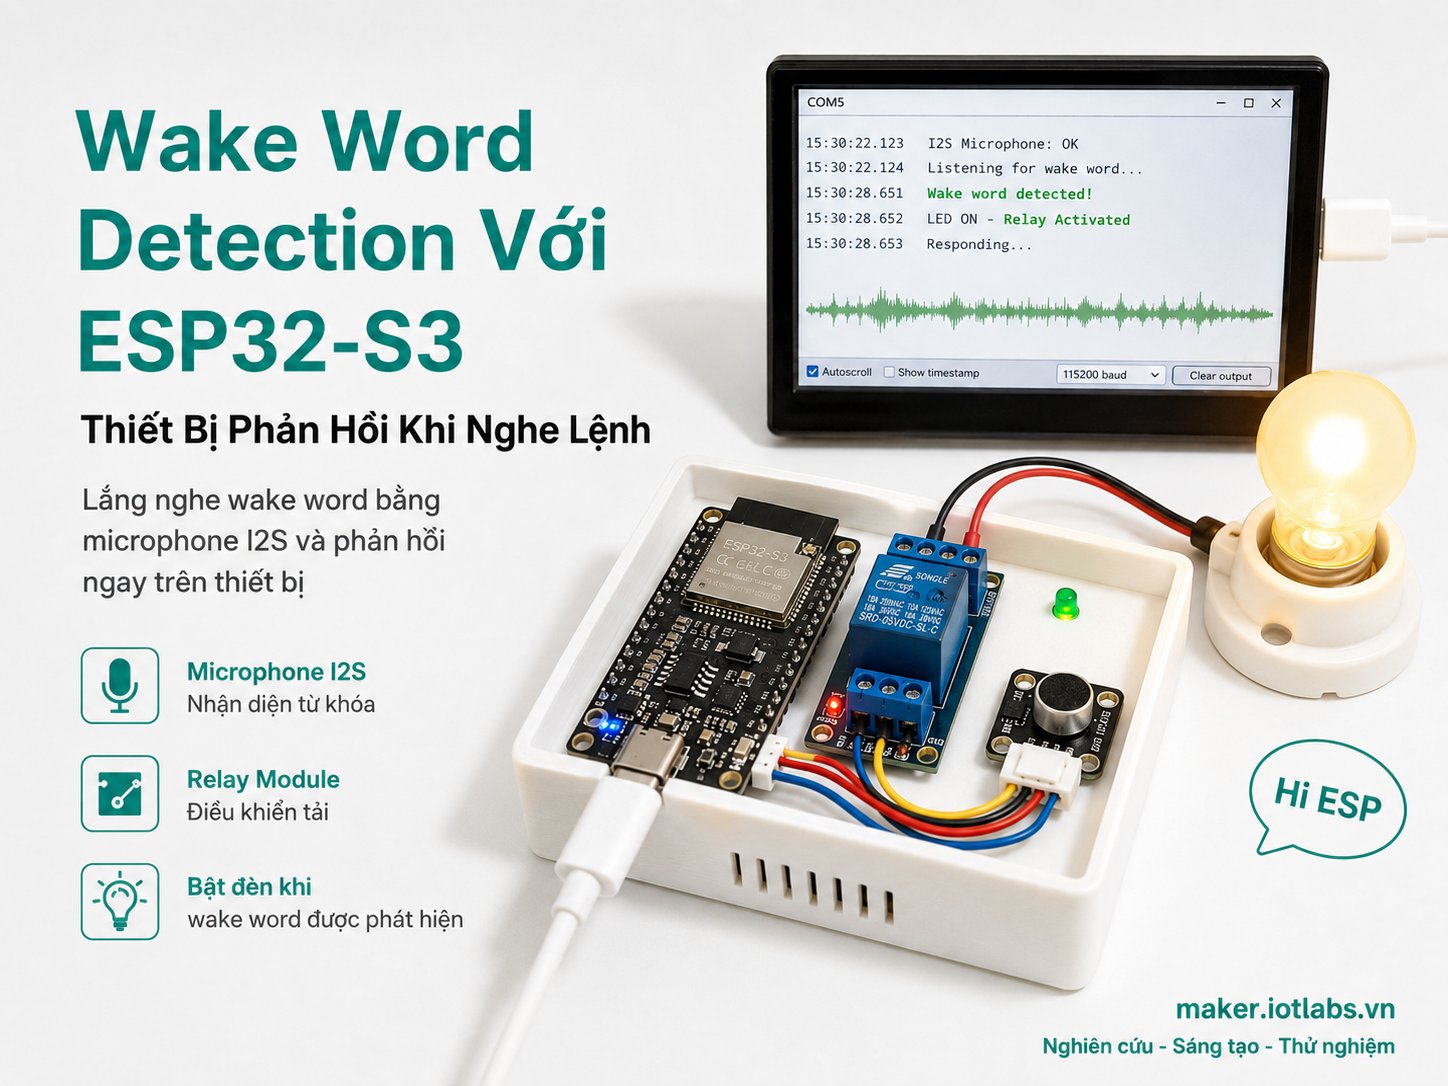
Trong dự án này, chúng ta sẽ xây dựng một thiết bị dùng ESP32-S3 có khả năng luôn lắng nghe âm thanh từ microphone I2S. Khi người dùng nói wake word, ví dụ:
Hi ESPthiết bị sẽ phản hồi bằng cách:
- In thông báo ra Serial Monitor.
- Bật LED trong vài giây.
- Có thể mở rộng để bật relay, buzzer, gửi MQTT hoặc đánh thức hệ thống điều khiển giọng nói.
Đây là nền tảng quan trọng để làm các thiết bị AIoT như:
- Đèn thông minh kích hoạt bằng giọng nói.
- Thiết bị trợ lý mini chạy offline.
- Bộ điều khiển nhà thông minh không cần Internet.
- Node IoT chỉ bắt đầu nghe lệnh sau khi được đánh thức.
- Thiết bị tiết kiệm tài nguyên, không phải xử lý giọng nói liên tục ở mức cao.
2. Dự án này hoạt động như thế nào?
Luồng xử lý cơ bản:
Người dùng nói wake word
        ↓
Microphone I2S thu âm thanh
        ↓
ESP32-S3 đọc dữ liệu âm thanh 16 kHz
        ↓
AFE xử lý tín hiệu âm thanh
        ↓
WakeNet kiểm tra có wake word hay không
        ↓
Nếu phát hiện wake word:
    - In log
    - Bật LED
    - Có thể kích hoạt hành động IoT
Trong bài này, wake word mặc định nên dùng là:
Hi ESPhoặc:
Hi Lexin
tùy model bạn chọn trong menuconfig.
Lưu ý quan trọng:
- Wake word không giống speech command.
- Wake word chỉ dùng để “đánh thức” thiết bị.
- Sau khi wake word được phát hiện, bạn có thể mở rộng thêm nhận diện lệnh bằng MultiNet.
- Không nên khẳng định ESP32-S3 có thể hiểu tiếng Việt tự do nếu chưa có model phù hợp.
3. Phần cứng cần chuẩn bị
| Linh kiện | Số lượng | Ghi chú |
|---|---|---|
| ESP32-S3 DevKit | 1 | Nên dùng bản có PSRAM, ví dụ ESP32-S3 N16R8 |
| Microphone I2S INMP441 | 1 | Micro digital I2S phổ biến |
| LED 5mm | 1 | Làm output phản hồi |
| Điện trở 220Ω hoặc 330Ω | 1 | Hạn dòng cho LED |
| Breadboard | 1 | Dùng để test nhanh |
| Dây jumper | Vài sợi | Kết nối module |
| Cáp USB-C data | 1 | Dùng nạp firmware và xem log |
Khuyến nghị board:
ESP32-S3 N16R8 hoặc ESP32-S3 DevKitC-1 có PSRAMKhông nên dùng ESP32 thường cho bài này nếu bạn mới bắt đầu, vì ESP32-S3 phù hợp hơn cho các tác vụ xử lý giọng nói và AIoT.
4. Sơ đồ kết nối
4.1. Kết nối INMP441 với ESP32-S3
| INMP441 | ESP32-S3 | Chức năng |
|---|---|---|
| VDD | 3V3 | Nguồn 3.3V |
| GND | GND | Mass |
| SCK | GPIO 5 | I2S BCLK |
| WS | GPIO 6 | I2S Word Select / LRCLK |
| SD | GPIO 4 | I2S Data In |
| L/R | GND | Chọn kênh Left |
Không cấp 5V cho INMP441. Module này nên dùng 3.3V.
4.2. Kết nối LED phản hồi
| LED | ESP32-S3 |
|---|---|
| Chân dài LED / Anode | GPIO 2 qua điện trở 220Ω |
| Chân ngắn LED / Cathode | GND |
Sơ đồ đơn giản:
ESP32-S3 GPIO2 ── 220Ω ── Anode LED
Cathode LED ───────────── GND
5. Chuẩn bị môi trường ESP-IDF
Dự án này dùng ESP-IDF, không dùng Arduino IDE, vì ESP-SR/WakeNet hoạt động ổn định hơn trong môi trường ESP-IDF.
Kiểm tra ESP-IDF:
idf.py --versionKhuyến nghị:
ESP-IDF 5.3.x, 5.4.x hoặc 5.5.xTạo thư mục dự án:
mkdir iotlabs-esp32s3-wake-word
cd iotlabs-esp32s3-wake-word
Cấu trúc dự án:
iotlabs-esp32s3-wake-word/
├── CMakeLists.txt
├── partitions.csv
├── sdkconfig.defaults
└── main/
    ├── CMakeLists.txt
    ├── idf_component.yml
    └── main.c
6. File CMakeLists.txt ở thư mục gốc
Tạo file:
touch CMakeLists.txt
Nội dung:
cmake_minimum_required(VERSION 3.16)

include($ENV{IDF_PATH}/tools/cmake/project.cmake)

project(iotlabs_esp32s3_wake_word)
7. File partitions.csv
ESP-SR cần phân vùng riêng để lưu model WakeNet. Tạo file:
touch partitions.csv
Nội dung:
# Name,   Type, SubType, Offset,   Size
nvs,      data, nvs,     0x9000,   0x4000
phy_init, data, phy,     0xf000,   0x1000
factory,  app,  factory, 0x10000,  4M
model,    data, spiffs,           , 6M
Giải thích:
factory: chứa firmware chính.model: chứa model WakeNet.- Nên dùng board flash 8MB hoặc 16MB.
- Nếu board chỉ có 4MB flash, khả năng cao sẽ không đủ bộ nhớ cho firmware và model.
8. File sdkconfig.defaults
Tạo file:
touch sdkconfig.defaults
Nội dung:
CONFIG_IDF_TARGET="esp32s3"

# Flash / partition
CONFIG_ESPTOOLPY_FLASHSIZE_16MB=y
CONFIG_PARTITION_TABLE_CUSTOM=y
CONFIG_PARTITION_TABLE_CUSTOM_FILENAME="partitions.csv"
CONFIG_PARTITION_TABLE_FILENAME="partitions.csv"
CONFIG_PARTITION_TABLE_OFFSET=0x8000

# CPU / PSRAM
CONFIG_ESP_DEFAULT_CPU_FREQ_MHZ_240=y
CONFIG_SPIRAM=y
CONFIG_SPIRAM_MODE_OCT=y
CONFIG_SPIRAM_SPEED_80M=y

# ESP-SR WakeNet model
CONFIG_SR_WN_WN9_HIESP=y

# Optional VAD model, useful for later expansion
CONFIG_SR_VADN_VADNET1_MEDIUM=y
Nếu board của bạn không có PSRAM, hãy dùng board có PSRAM cho dự án này để tránh lỗi thiếu RAM.
9. File main/idf_component.yml
Tạo thư mục và file:
mkdir main
touch main/idf_component.yml
Nội dung:
dependencies:
  espressif/esp-sr: "^2.1.3"
File này yêu cầu ESP-IDF Component Manager tự tải component ESP-SR.
10. File main/CMakeLists.txt
Tạo file:
touch main/CMakeLists.txtNội dung:
idf_component_register(
    SRCS "main.c"
    INCLUDE_DIRS "."
)
11. Code đầy đủ main/main.c
Tạo file:
touch main/main.cNội dung đầy đủ:
#include <stdio.h>
#include <stdlib.h>
#include <string.h>
#include <stdbool.h>

#include "freertos/FreeRTOS.h"
#include "freertos/task.h"

#include "esp_log.h"
#include "esp_err.h"
#include "esp_system.h"

#include "driver/gpio.h"
#include "driver/i2s_std.h"

#include "esp_afe_sr_iface.h"
#include "esp_afe_sr_models.h"
#include "model_path.h"

/*
 * IoTLabs Maker Project
 * Wake Word Detection với ESP32-S3 + INMP441
 *
 * Wake word mặc định: Hi ESP
 * Output demo: bật LED khi phát hiện wake word.
 */

// =======================
// Cấu hình GPIO
// =======================

#define LED_GPIO            GPIO_NUM_2

#define I2S_BCLK_GPIO       GPIO_NUM_5
#define I2S_WS_GPIO         GPIO_NUM_6
#define I2S_DIN_GPIO        GPIO_NUM_4

// INMP441 thường xuất dữ liệu 24-bit trong frame 32-bit.
// Dịch phải để đưa về gần biên độ 16-bit.
// Nếu tín hiệu quá nhỏ, giảm giá trị này xuống 13.
// Nếu tín hiệu bị méo/clipping, tăng lên 15 hoặc 16.
#define MIC_SHIFT_BITS      14

// AFE/WakeNet dùng 16 kHz, 16-bit, mono
#define SAMPLE_RATE_HZ      16000

// LED sáng bao lâu sau khi phát hiện wake word
#define RESPONSE_TIME_MS    1200

// Input format cho AFE.
// "M" nghĩa là 1 kênh microphone.
#define AFE_INPUT_FORMAT    "M"

static const char *TAG = "IOTLABS_WAKE_WORD";

static i2s_chan_handle_t s_i2s_rx_chan = NULL;
static const esp_afe_sr_iface_t *s_afe_handle = NULL;
static volatile bool s_task_running = true;

// =======================
// LED response
// =======================

static void response_gpio_init(void)
{
    gpio_config_t io_conf = {
        .pin_bit_mask = 1ULL << LED_GPIO,
        .mode = GPIO_MODE_OUTPUT,
        .pull_up_en = GPIO_PULLUP_DISABLE,
        .pull_down_en = GPIO_PULLDOWN_DISABLE,
        .intr_type = GPIO_INTR_DISABLE,
    };

    ESP_ERROR_CHECK(gpio_config(&io_conf));
    gpio_set_level(LED_GPIO, 0);
}

static void response_on(void)
{
    gpio_set_level(LED_GPIO, 1);
}

static void response_off(void)
{
    gpio_set_level(LED_GPIO, 0);
}

static void response_blink_success(void)
{
    response_on();
    vTaskDelay(pdMS_TO_TICKS(RESPONSE_TIME_MS));
    response_off();
}

// =======================
// I2S microphone init
// =======================

static esp_err_t i2s_microphone_init(void)
{
    ESP_LOGI(TAG, "Initializing I2S microphone...");

    i2s_chan_config_t chan_cfg = I2S_CHANNEL_DEFAULT_CONFIG(
        I2S_NUM_AUTO,
        I2S_ROLE_MASTER
    );

    ESP_ERROR_CHECK(i2s_new_channel(&chan_cfg, NULL, &s_i2s_rx_chan));

    i2s_std_config_t std_cfg = {
        .clk_cfg = I2S_STD_CLK_DEFAULT_CONFIG(SAMPLE_RATE_HZ),
        .slot_cfg = I2S_STD_PHILIPS_SLOT_DEFAULT_CONFIG(
            I2S_DATA_BIT_WIDTH_32BIT,
            I2S_SLOT_MODE_MONO
        ),
        .gpio_cfg = {
            .mclk = I2S_GPIO_UNUSED,
            .bclk = I2S_BCLK_GPIO,
            .ws = I2S_WS_GPIO,
            .dout = I2S_GPIO_UNUSED,
            .din = I2S_DIN_GPIO,
            .invert_flags = {
                .mclk_inv = false,
                .bclk_inv = false,
                .ws_inv = false,
            },
        },
    };

    /*
     * INMP441:
     * - Nếu chân L/R nối GND, thường dùng slot LEFT.
     * - Nếu chân L/R nối 3V3, đổi sang I2S_STD_SLOT_RIGHT.
     */
    std_cfg.slot_cfg.slot_mask = I2S_STD_SLOT_LEFT;

    ESP_ERROR_CHECK(i2s_channel_init_std_mode(s_i2s_rx_chan, &std_cfg));
    ESP_ERROR_CHECK(i2s_channel_enable(s_i2s_rx_chan));

    ESP_LOGI(TAG, "I2S microphone initialized");
    ESP_LOGI(TAG, "BCLK GPIO: %d, WS GPIO: %d, DIN GPIO: %d",
             I2S_BCLK_GPIO, I2S_WS_GPIO, I2S_DIN_GPIO);

    return ESP_OK;
}

// =======================
// AFE feed task
// =======================

static void feed_task(void *arg)
{
    esp_afe_sr_data_t *afe_data = (esp_afe_sr_data_t *)arg;

    int feed_chunksize = s_afe_handle->get_feed_chunksize(afe_data);
    int feed_channel_num = s_afe_handle->get_feed_channel_num(afe_data);

    ESP_LOGI(TAG, "AFE feed chunksize: %d", feed_chunksize);
    ESP_LOGI(TAG, "AFE feed channel num: %d", feed_channel_num);

    if (feed_channel_num != 1) {
        ESP_LOGW(TAG, "This example expects 1 microphone channel");
    }

    int32_t *i2s_raw = (int32_t *)calloc(feed_chunksize, sizeof(int32_t));
    int16_t *afe_feed = (int16_t *)calloc(feed_chunksize * feed_channel_num, sizeof(int16_t));

    if (!i2s_raw || !afe_feed) {
        ESP_LOGE(TAG, "Failed to allocate audio buffers");
        goto cleanup;
    }

    while (s_task_running) {
        size_t bytes_read = 0;

        esp_err_t ret = i2s_channel_read(
            s_i2s_rx_chan,
            i2s_raw,
            feed_chunksize * sizeof(int32_t),
            &bytes_read,
            portMAX_DELAY
        );

        if (ret != ESP_OK) {
            ESP_LOGE(TAG, "I2S read failed: %s", esp_err_to_name(ret));
            continue;
        }

        int samples_read = bytes_read / sizeof(int32_t);

        for (int i = 0; i < feed_chunksize; i++) {
            int32_t sample32 = 0;

            if (i < samples_read) {
                sample32 = i2s_raw[i];
            }

            /*
             * Convert 32-bit I2S sample to signed 16-bit PCM.
             * INMP441 data is usually left-aligned.
             */
            int32_t sample16 = sample32 >> MIC_SHIFT_BITS;

            if (sample16 > 32767) {
                sample16 = 32767;
            } else if (sample16 < -32768) {
                sample16 = -32768;
            }

            afe_feed[i] = (int16_t)sample16;
        }

        s_afe_handle->feed(afe_data, afe_feed);
    }

cleanup:
    if (i2s_raw) {
        free(i2s_raw);
    }

    if (afe_feed) {
        free(afe_feed);
    }

    vTaskDelete(NULL);
}

// =======================
// Wake word detect task
// =======================

static void detect_task(void *arg)
{
    esp_afe_sr_data_t *afe_data = (esp_afe_sr_data_t *)arg;

    ESP_LOGI(TAG, "Wake word detection started");
    ESP_LOGI(TAG, "Say: Hi ESP");

    while (s_task_running) {
        afe_fetch_result_t *res = s_afe_handle->fetch(afe_data);

        if (!res) {
            ESP_LOGW(TAG, "AFE fetch returned NULL");
            continue;
        }

        if (res->ret_value == ESP_FAIL) {
            ESP_LOGE(TAG, "AFE fetch failed");
            break;
        }

        if (res->wakeup_state == WAKENET_DETECTED) {
            ESP_LOGI(TAG, "====================================");
            ESP_LOGI(TAG, "WAKE WORD DETECTED!");
            ESP_LOGI(TAG, "Model index: %d", res->wakenet_model_index);
            ESP_LOGI(TAG, "Wake word index: %d", res->wake_word_index);
            ESP_LOGI(TAG, "Device response: LED ON");
            ESP_LOGI(TAG, "====================================");

            response_blink_success();
        }
    }

    vTaskDelete(NULL);
}

// =======================
// App main
// =======================

void app_main(void)
{
    ESP_LOGI(TAG, "IoTLabs ESP32-S3 Wake Word Detection");
    ESP_LOGI(TAG, "Initializing...");

    response_gpio_init();
    ESP_ERROR_CHECK(i2s_microphone_init());

    /*
     * Load speech recognition models from partition named "model".
     * The model partition must exist in partitions.csv.
     */
    srmodel_list_t *models = esp_srmodel_init("model");

    if (models == NULL) {
        ESP_LOGE(TAG, "Failed to initialize SR models");
        ESP_LOGE(TAG, "Check partitions.csv and selected WakeNet model in menuconfig");
        return;
    }

    ESP_LOGI(TAG, "SR models initialized");

    /*
     * Create AFE config.
     * AFE_TYPE_SR: Speech Recognition.
     * AFE_MODE_LOW_COST: lower resource usage, suitable for maker demo.
     */
    afe_config_t *afe_config = afe_config_init(
        AFE_INPUT_FORMAT,
        models,
        AFE_TYPE_SR,
        AFE_MODE_LOW_COST
    );

    if (afe_config == NULL) {
        ESP_LOGE(TAG, "Failed to create AFE config");
        return;
    }

    s_afe_handle = esp_afe_handle_from_config(afe_config);

    if (s_afe_handle == NULL) {
        ESP_LOGE(TAG, "Failed to get AFE handle");
        return;
    }

    esp_afe_sr_data_t *afe_data = s_afe_handle->create_from_config(afe_config);

    if (afe_data == NULL) {
        ESP_LOGE(TAG, "Failed to create AFE data");
        return;
    }

    afe_config_free(afe_config);

    xTaskCreatePinnedToCore(
        feed_task,
        "feed_task",
        8 * 1024,
        (void *)afe_data,
        5,
        NULL,
        0
    );

    xTaskCreatePinnedToCore(
        detect_task,
        "detect_task",
        8 * 1024,
        (void *)afe_data,
        5,
        NULL,
        1
    );

    ESP_LOGI(TAG, "System ready");
}
12. Cấu hình project
Đặt target là ESP32-S3:
idf.py set-target esp32s3Mở menuconfig:
idf.py menuconfigKiểm tra các mục sau.
12.1. Partition table
Vào:
Partition TableChọn:
Custom partition table CSVĐảm bảo file là:
partitions.csv12.2. Flash size
Vào:
Serial flasher configChọn flash size phù hợp board, ví dụ:
16 MBNếu board của bạn là 8MB thì chọn 8MB và giảm kích thước model trong partitions.csv nếu cần.
12.3. Chọn WakeNet model
Vào:
ESP Speech RecognitionChọn wake word:
Hi ESPTương ứng config thường là:
CONFIG_SR_WN_WN9_HIESP=yCó thể chọn:
Hi Lexinnếu bạn muốn test wake word khác.
13. Build, flash và monitor
Build project:
idf.py buildNạp firmware:
idf.py flashMở Serial Monitor:
idf.py monitorHoặc chạy gộp:
idf.py build flash monitorThoát monitor:
Ctrl + ]14. Cách test
Sau khi flash xong, mở Serial Monitor. Bạn sẽ thấy log tương tự:
IoTLabs ESP32-S3 Wake Word Detection
Initializing...
I2S microphone initialized
SR models initialized
Wake word detection started
Say: Hi ESP
System ready
Nói rõ ràng gần microphone:
Hi ESPNếu nhận diện thành công, log sẽ hiện:
WAKE WORD DETECTED!
Model index: 1
Wake word index: 1
Device response: LED ON
LED trên GPIO2 sẽ sáng khoảng 1.2 giây.
15. Kiểm tra lỗi thường gặp
Lỗi 1: Không detect wake word
Nguyên nhân thường gặp:
- Microphone đấu sai chân.
- L/R của INMP441 không khớp với
slot_mask. - Micro đặt quá xa miệng.
- Môi trường quá ồn.
- Chưa chọn wake word model trong
menuconfig. - Board không có PSRAM hoặc thiếu RAM.
- Model partition chưa đúng.
Cách xử lý:
- Kiểm tra lại dây:
INMP441 SCK → GPIO5
INMP441 WS  → GPIO6
INMP441 SD  → GPIO4
INMP441 VDD → 3V3
INMP441 GND → GND
INMP441 L/R → GND
- Nếu L/R nối GND mà không có tín hiệu, thử đổi:
std_cfg.slot_cfg.slot_mask = I2S_STD_SLOT_RIGHT;- Nếu tín hiệu microphone quá nhỏ, đổi:
#define MIC_SHIFT_BITS 13- Nếu tín hiệu bị méo, đổi:
#define MIC_SHIFT_BITS 15Lỗi 2: Build lỗi thiếu model
Thông báo có thể liên quan đến:
Failed to initialize SR modelsCách xử lý:
- Kiểm tra có phân vùng
modeltrongpartitions.csv. - Chạy lại:
idf.py fullclean
idf.py set-target esp32s3
idf.py menuconfig
idf.py build flash monitor
- Đảm bảo đã chọn wake word trong:
ESP Speech RecognitionLỗi 3: Board reset liên tục
Nguyên nhân thường gặp:
- Thiếu RAM.
- Không bật PSRAM.
- Flash size sai.
- Model partition quá lớn hoặc sai offset.
- Dùng board ESP32-S3 không có PSRAM.
Cách xử lý:
- Dùng board ESP32-S3 có PSRAM.
- Bật PSRAM trong
menuconfig. - Kiểm tra flash size đúng với board.
- Dùng board 8MB hoặc 16MB flash.
Lỗi 4: Log báo AFE không có dữ liệu
Nguyên nhân thường gặp:
- I2S không đọc được dữ liệu.
- Sai chân BCLK, WS, DIN.
- Microphone chưa được cấp nguồn.
- L/R sai slot.
feed_taskkhông chạy.
Cách xử lý:
- Kiểm tra nguồn 3.3V.
- Kiểm tra GND chung.
- Đổi slot LEFT/RIGHT.
- Đặt microphone gần miệng hơn.
- Thử nói to và rõ hơn.
16. Mở rộng 1: Bật relay khi nghe wake word
Không nối relay trực tiếp vào GPIO nếu relay tiêu thụ dòng lớn. Nên dùng module relay có opto hoặc transistor driver.
Ví dụ đổi LED GPIO thành relay GPIO:
#define LED_GPIO GPIO_NUM_2có thể đổi thành:
#define LED_GPIO GPIO_NUM_10Hàm phản hồi hiện tại:
static void response_blink_success(void)
{
    response_on();
    vTaskDelay(pdMS_TO_TICKS(RESPONSE_TIME_MS));
    response_off();
}
Nếu dùng relay, có thể đổi thời gian:
#define RESPONSE_TIME_MS 3000Khi nghe wake word, relay bật trong 3 giây rồi tắt.
17. Mở rộng 2: Gửi MQTT khi phát hiện wake word
Sau khi detect wake word, thay vì chỉ bật LED, bạn có thể gửi MQTT event:
{
  "device": "esp32s3-wake-word",
  "event": "wake_word_detected",
  "wake_word": "hi_esp"
}
Luồng mở rộng:
Wake word detected
        ↓
ESP32-S3 publish MQTT
        ↓
IoTLabs Cloud / Home Assistant / Node-RED nhận event
        ↓
Kích hoạt automation
Ví dụ ứng dụng:
- Đánh thức dashboard.
- Bật đèn phòng.
- Gửi thông báo.
- Mở chế độ nghe lệnh tiếp theo.
- Ghi log thời điểm người dùng gọi thiết bị.
18. Mở rộng 3: Thêm nhận diện lệnh sau wake word
Bản hiện tại chỉ phát hiện wake word. Để làm thiết bị nghe lệnh hoàn chỉnh, bạn cần thêm bước nhận diện command sau khi wake word được phát hiện.
Luồng nâng cao:
Người dùng nói: "Hi ESP"
        ↓
WakeNet phát hiện wake word
        ↓
Thiết bị chuyển sang trạng thái LISTENING
        ↓
Người dùng nói: "Turn on the light"
        ↓
MultiNet nhận diện command
        ↓
ESP32-S3 bật LED / relay / gửi MQTT
Ví dụ command:
Turn on the light
Turn off the light
Open the door
Close the door
Với tiếng Việt như:
Bật đèn
Tắt đèn
Mở cửa
Đóng cửa
bạn cần kiểm tra model/ngôn ngữ được hỗ trợ hoặc huấn luyện model riêng. Không nên giả định model mặc định nhận diện tốt tiếng Việt.
19. Giải thích code chính
19.1. Khởi tạo microphone I2S
Hàm:
static esp_err_t i2s_microphone_init(void)
làm nhiệm vụ:
- Tạo I2S RX channel.
- Cấu hình sample rate 16 kHz.
- Cấu hình dữ liệu 32-bit từ INMP441.
- Gán chân BCLK, WS, DIN.
- Bật I2S channel để bắt đầu đọc âm thanh.
19.2. Feed task
Hàm:
static void feed_task(void *arg)
làm nhiệm vụ:
- Đọc audio raw từ I2S.
- Chuyển mẫu 32-bit thành 16-bit PCM.
- Đưa dữ liệu vào AFE bằng:
s_afe_handle->feed(afe_data, afe_feed);AFE cần dữ liệu đều đặn. Nếu feed bị chậm hoặc không có dữ liệu, WakeNet sẽ không hoạt động ổn định.
19.3. Detect task
Hàm:
static void detect_task(void *arg)
làm nhiệm vụ:
- Lấy kết quả xử lý từ AFE bằng:
afe_fetch_result_t *res = s_afe_handle->fetch(afe_data);- Kiểm tra trạng thái:
if (res->wakeup_state == WAKENET_DETECTED)- Nếu phát hiện wake word, bật LED phản hồi.
20. Kết quả mong đợi
Sau khi hoàn thành, bạn sẽ có một prototype như sau:
ESP32-S3 + INMP441 luôn lắng nghe âm thanh
Khi nói "Hi ESP"
Thiết bị phát hiện wake word
LED sáng lên để phản hồi
Serial Monitor ghi log sự kiện
Đây là nền tảng để xây dựng các thiết bị AIoT nâng cao:
- Smart speaker mini.
- Công tắc giọng nói offline.
- Gateway nhà thông minh.
- Thiết bị điều khiển MQTT bằng giọng nói.
- Trạm IoT có chế độ đánh thức bằng âm thanh.
21. Checklist hoàn thành
Trước khi kết thúc dự án, kiểm tra:
- ESP32-S3 có PSRAM.
- INMP441 dùng 3.3V.
- GND của ESP32-S3 và microphone nối chung.
- BCLK, WS, DIN đấu đúng.
partitions.csvcó phân vùngmodel.menuconfigđã chọn wake word.- Flash size đúng với board.
- Serial Monitor hiển thị hệ thống sẵn sàng.
- Nói “Hi ESP” thì LED bật và có log detect.
22. Kết luận
Dự án Wake Word Detection với ESP32-S3 giúp bạn hiểu cách xây dựng một thiết bị IoT có khả năng phản hồi bằng giọng nói ngay trên vi điều khiển. Điểm mạnh của hướng này là thiết bị có thể phát hiện wake word offline, không cần gửi âm thanh lên cloud để xử lý.
Sau bài này bạn đã có kiến thưc cơ bản về Wake Word ứng dụng AIoI, có thể mở rộng hơn với các tiêu chí sau:
- Huấn luyện wake word riêng
- Thêm MultiNet để nhận diện lệnh sau wake word.
- Gửi MQTT khi phát hiện wake word.
- Kết hợp Home Assistant để kích hoạt automation.
- Thêm loa I2S để thiết bị phản hồi bằng âm thanh.