
Series: Lập trình Raspberry Pi & Ứng dụng thực tế Phần 2 — Lập trình GPIO & phần cứng Bài 10: OLED/LCD hiển thị trạng thái (SSD1306 I2C) — nhiệt độ, IP, service status
1) Mục tiêu bài học
Sau bài này bạn sẽ:
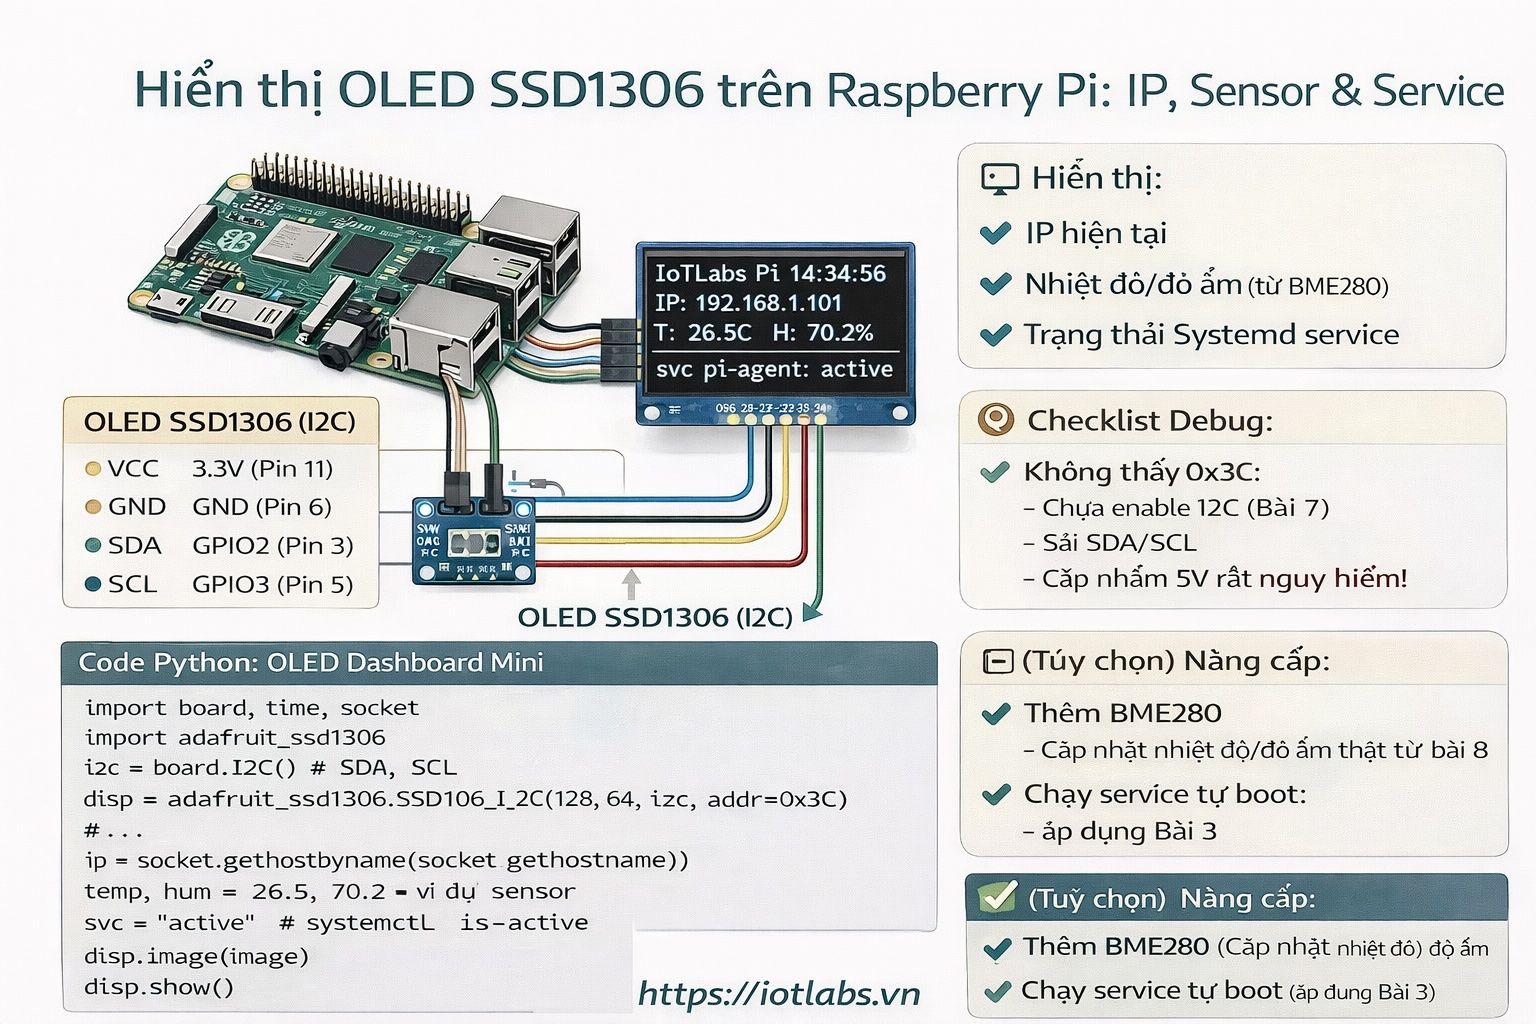
- Kết nối và hiển thị lên OLED SSD1306 I2C (128×64).
- Hiển thị 3 thứ “thực chiến”:
- IP hiện tại
- Nhiệt độ/độ ẩm (từ BME280 hoặc giá trị demo)
- Trạng thái service (systemd: active/inactive)
- Có code Python chạy được ngay.
2) Phần cứng & wiring (SSD1306 I2C)
OLED SSD1306 thường có 4 chân: VCC, GND, SDA, SCL
- VCC → 3.3V (Pin 1) (nhiều module chịu 3.3V tốt)
- GND → GND (Pin 6)
- SDA → GPIO2 (Pin 3)
- SCL → GPIO3 (Pin 5)
Kiểm tra OLED có lên I2C không:
sudo i2cdetect -y 1Thường OLED là 0x3C hoặc 0x3D.
3) Cài thư viện cần thiết
sudo apt update
sudo apt -y install python3-pip python3-pil i2c-tools
pip3 install adafruit-circuitpython-ssd1306
4) Code: OLED dashboard mini
Tạo thư mục:
mkdir -p ~/apps/oled-status
cd ~/apps/oled-status
nano oled_status.py
Dán code:
import time
import socket
import subprocess
from datetime import datetime

import board
import busio
from PIL import Image, ImageDraw, ImageFont
import adafruit_ssd1306

OLED_ADDR = 0x3C
SERVICE_NAME = "pi-agent"   # đổi thành service bạn đang dùng
REFRESH_SEC = 2

def get_ip():
    try:
        # cách lấy IP “thực tế” hay dùng
        s = socket.socket(socket.AF_INET, socket.SOCK_DGRAM)
        s.connect(("1.1.1.1", 80))
        ip = s.getsockname()[0]
        s.close()
        return ip
    except Exception:
        return "no-ip"

def get_service_status(name: str) -> str:
    try:
        r = subprocess.run(
            ["systemctl", "is-active", name],
            capture_output=True, text=True, check=False
        )
        return r.stdout.strip() or "unknown"
    except Exception:
        return "unknown"

def main():
    i2c = busio.I2C(board.SCL, board.SDA)
    disp = adafruit_ssd1306.SSD1306_I2C(128, 64, i2c, addr=OLED_ADDR)

    disp.fill(0)
    disp.show()

    # canvas
    width = disp.width
    height = disp.height
    image = Image.new("1", (width, height))
    draw = ImageDraw.Draw(image)

    # font
    font = ImageFont.load_default()

    while True:
        draw.rectangle((0, 0, width, height), outline=0, fill=0)

        now = datetime.now().strftime("%H:%M:%S")
        ip = get_ip()
        svc = get_service_status(SERVICE_NAME)

        # demo sensor (bạn có thể thay bằng BME280 từ bài 8)
        temp = 26.5
        hum = 70.2

        draw.text((0, 0),  f"IoTLabs Pi  {now}", font=font, fill=255)
        draw.text((0, 16), f"IP: {ip}", font=font, fill=255)
        draw.text((0, 32), f"T: {temp:.1f}C  H: {hum:.1f}%", font=font, fill=255)
        draw.text((0, 48), f"svc {SERVICE_NAME}: {svc}", font=font, fill=255)

        disp.image(image)
        disp.show()

        time.sleep(REFRESH_SEC)

if __name__ == "__main__":
    main()
Chạy:
python3 oled_status.py5) (Tuỳ chọn) Kết hợp dữ liệu BME280 thật (từ Bài 8)
Nếu bạn đã có BME280, bạn chỉ cần thay phần demo:
Cài:
pip3 install adafruit-circuitpython-bme280Thêm vào code:
import adafruit_bme280
bme = adafruit_bme280.Adafruit_BME280_I2C(i2c)
temp = bme.temperature
hum = bme.humidity
6) Lỗi thường gặp & cách fix
- i2cdetect không thấy 0x3C:
- chưa enable I2C (Bài 7)
- sai SDA/SCL
- module OLED cấp nhầm 5V (nguy hiểm)
- Màn hình trắng/đen:
- sai địa chỉ (0x3C vs 0x3D)
- Text bị “cắt”:
- OLED 128×64 rất nhỏ → chia dòng hợp lý, viết ngắn
7) Bài tập nâng cấp
- Hiển thị thêm: CPU temp (đọc từ vcgencmd measure_temp).
- Hiển thị thêm: disk usage (df -h).
- Chạy script OLED bằng systemd service để tự chạy khi boot.