
Giới thiệu series “Lập trình ESP32 38 Pin & NRF” – Phần 8
Ở các phần trước, bạn đã:
- Dựng được mạng nhiều node cảm biến → 1 gateway ESP32 dùng NRF24L01.
- Kết hợp cảm biến thực tế như DHT11/DHT22 và MQ-2 (khí gas), gửi dữ liệu bằng
struct SensorPacket.
Trong Phần 8, chúng ta sẽ đưa hệ thống ra khỏi phạm vi bàn test bằng cách:
- Cho ESP32 Gateway kết nối WiFi.
- Đóng gói dữ liệu thành chuỗi JSON.
- Publish lên MQTT broker / IoTLabs Cloud để các ứng dụng khác (Dashboard web, mobile app, Node-RED, Home Assistant,…) có thể subscribe và hiển thị.
1. Mục tiêu bài học
Sau bài này, bạn sẽ:
- Biết cách cấu hình ESP32 kết nối WiFi (SSID, password).
- Hiểu khái niệm MQTT broker, topic, payload trong bối cảnh IoTLabs Cloud.
- Publish dữ liệu cảm biến dạng JSON từ gateway ESP32 lên MQTT.
- Kiểm tra dữ liệu bằng MQTT client (MQTTX, MQTT Explorer, Node-RED, v.v.).
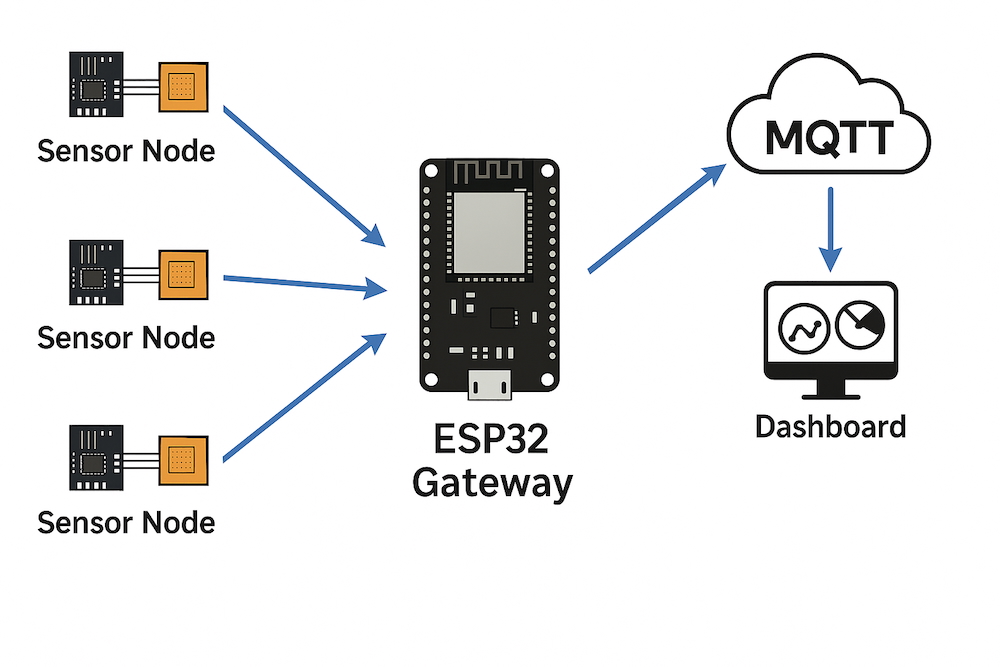
2. Kiến trúc hệ thống: NRF24L01 → ESP32 Gateway → MQTT / IoTLabs Cloud
Kiến trúc tổng quát sau khi thêm MQTT:
[Node 1] ESP32 + NRF + DHT + MQ-2
[Node 2] ESP32 + NRF + ...
[Node 3] ESP32 + NRF + ...
                ↓ (NRF24L01)
        ESP32 Gateway + NRF
                ↓ (WiFi)
          MQTT Broker / IoTLabs Cloud
                ↓
      Dashboard / Mobile App / Node-RED
- Lớp thiết bị (Device layer): các node cảm biến gửi
SensorPacketqua NRF24L01. - Lớp gateway: ESP32 nhận struct, chuyển thành JSON.
- Lớp cloud: MQTT broker (có thể là Mosquitto, HiveMQ, IoTLabs Cloud MQTT,…).
3. Chuẩn bị trước khi code
3.1. Thông tin WiFi & MQTT
Bạn cần chuẩn bị:
- WiFi:
WIFI_SSID: tên mạng WiFi.WIFI_PASSWORD: mật khẩu.
- MQTT broker:
MQTT_SERVER: địa chỉ IP hoặc domain (ví dụ:broker.hivemq.com,mqtt.iotlabs.vn,192.168.1.100).MQTT_PORT: thường là1883(MQTT không SSL).MQTT_USER,MQTT_PASSWORD: nếu broker yêu cầu đăng nhập (nếu không, có thể để trống).
- Topic MQTT (gợi ý chuẩn IoTLabs):
- Topic chung cho mạng cảm biến:
iotlabs/sensors/gateway1 - Hoặc mỗi node 1 topic, ví dụ:
iotlabs/sensors/gateway1/node/1 iotlabs/sensors/gateway1/node/2
- Topic chung cho mạng cảm biến:
Trong bài này, để đơn giản, ta sử dụng 1 topic chung và embed nodeId trong JSON.
3.2. Thư viện cần cài
Trong Arduino IDE:
- Cài PubSubClient (by Nick O’Leary) cho MQTT.
- Đã cài RF24 ở các phần trước.
4. Thiết kế JSON cho dữ liệu cảm biến
Từ các phần trước, struct dữ liệu (ví dụ Phần 7):
struct SensorPacket {
  uint8_t  nodeId;
  float    temperature;
  float    humidity;
  float    gas;
  uint32_t uptime;
};
Ta sẽ chuyển sang JSON dạng:
{
  "nodeId": 1,
  "temperature": 27.5,
  "humidity": 60.3,
  "gas": 15.2,
  "uptime": 123,
  "timestamp": 1710000000
}
timestampcó thể làmillis()hoặc thời gian thực nếu bạn có NTP/RTC (trong bài demo dùng tạmmillis()/1000).
5. Code ESP32 Gateway: nhận NRF24L01 và publish MQTT
5.1. Khai báo thông tin WiFi & MQTT
⚠️ Bạn nên để các thông tin này ở file cấu hình riêng hoặc
secrets.hkhi deploy thực tế.
#include <Arduino.h>
#include <WiFi.h>
#include <SPI.h>
#include <RF24.h>
#include <PubSubClient.h>

// ===== Thong tin WiFi =====
const char* WIFI_SSID     = "YourWiFiSSID";
const char* WIFI_PASSWORD = "YourWiFiPassword";

// ===== Thong tin MQTT =====
const char* MQTT_SERVER   = "192.168.1.100";   // IP broker hoac domain
const uint16_t MQTT_PORT  = 1883;
const char* MQTT_USER     = "";                // de trong neu broker khong yeu cau
const char* MQTT_PASSWORD = "";

// Topic chung
const char* MQTT_TOPIC    = "iotlabs/sensors/gateway1";

// ===== NRF24L01 pins =====
#define PIN_NRF_CE   4
#define PIN_NRF_CSN  5

RF24 radio(PIN_NRF_CE, PIN_NRF_CSN);
WiFiClient espClient;
PubSubClient mqttClient(espClient);

const byte address[6] = "00001";

struct SensorPacket {
  uint8_t  nodeId;
  float    temperature;
  float    humidity;
  float    gas;
  uint32_t uptime;
};

SensorPacket packet;
5.2. Hàm kết nối WiFi
void connectWiFi() {
  Serial.print(F("Dang ket noi WiFi: "));
  Serial.println(WIFI_SSID);

  WiFi.mode(WIFI_STA);
  WiFi.begin(WIFI_SSID, WIFI_PASSWORD);

  uint8_t retries = 0;
  while (WiFi.status() != WL_CONNECTED) {
    delay(500);
    Serial.print(".");
    if (++retries > 40) { // ~20 giay
      Serial.println();
      Serial.println(F("Khong ket noi duoc WiFi, reset lai ESP32"));
      ESP.restart();
    }
  }

  Serial.println();
  Serial.print(F("Da ket noi WiFi, IP: "));
  Serial.println(WiFi.localIP());
}
5.3. Hàm kết nối MQTT broker
void connectMQTT() {
  mqttClient.setServer(MQTT_SERVER, MQTT_PORT);

  while (!mqttClient.connected()) {
    Serial.print(F("Dang ket noi MQTT..."));

    // Client ID nen unique, co the them chip ID
    String clientId = "ESP32Gateway-" + String((uint32_t)ESP.getEfuseMac(), HEX);

    bool ok;
    if (strlen(MQTT_USER) > 0) {
      ok = mqttClient.connect(clientId.c_str(), MQTT_USER, MQTT_PASSWORD);
    } else {
      ok = mqttClient.connect(clientId.c_str());
    }

    if (ok) {
      Serial.println(F("OK"));
    } else {
      Serial.print(F("Fail, rc="));
      Serial.print(mqttClient.state());
      Serial.println(F(" -> thu lai sau 3s"));
      delay(3000);
    }
  }
}
5.4. Hàm publish JSON lên MQTT
void publishSensorPacket(const SensorPacket& p) {
  // Tao JSON don gian bang snprintf
  char payload[256];
  unsigned long ts = millis() / 1000; // timestamp tam thoi

  snprintf(payload, sizeof(payload),
           "{\"nodeId\":%u,\"temperature\":%.2f,\"humidity\":%.2f,\"gas\":%.2f,\"uptime\":%lu,\"timestamp\":%lu}",
           p.nodeId,
           p.temperature,
           p.humidity,
           p.gas,
           (unsigned long)p.uptime,
           ts);

  Serial.print(F("MQTT publish -> "));
  Serial.print(MQTT_TOPIC);
  Serial.print(F(" : "));
  Serial.println(payload);

  if (!mqttClient.publish(MQTT_TOPIC, payload)) {
    Serial.println(F("Canh bao: publish that bai!"));
  }
}
5.5. setup() – khởi tạo tất cả
void setup() {
  Serial.begin(115200);
  delay(1000);
  Serial.println();
  Serial.println(F("=== ESP32 NRF Gateway -> MQTT / IoTLabs Cloud ==="));

  // Ket noi WiFi
  connectWiFi();

  // Khoi tao NRF24L01
  if (!radio.begin()) {
    Serial.println(F("Loi: Khong khoi tao duoc NRF24L01"));
    while (1) { delay(1000); }
  }

  radio.setChannel(108);
  radio.setPALevel(RF24_PA_LOW);
  radio.setDataRate(RF24_1MBPS);

  radio.openReadingPipe(1, address);
  radio.startListening();

  // Ket noi MQTT
  connectMQTT();
}
5.6. loop() – đọc NRF và đẩy MQTT
void loop() {
  // Duy tri ket noi MQTT
  if (!mqttClient.connected()) {
    connectMQTT();
  }
  mqttClient.loop();

  // Neu co du lieu tu NRF
  if (radio.available()) {
    while (radio.available()) {
      radio.read(&packet, sizeof(packet));

      Serial.print(F("NRF RX - node="));
      Serial.print(packet.nodeId);
      Serial.print(F(", T="));
      Serial.print(packet.temperature, 1);
      Serial.print(F(", H="));
      Serial.print(packet.humidity, 1);
      Serial.print(F(", Gas="));
      Serial.print(packet.gas, 1);
      Serial.print(F(", Uptime="));
      Serial.println(packet.uptime);

      // Publish len MQTT
      publishSensorPacket(packet);
    }
  }

  delay(10);
}
Đến đây, mỗi lần gateway nhận được một gói SensorPacket từ bất kỳ node nào, nó sẽ:
- In log ra Serial.
- Đóng gói thành JSON.
- Publish lên topic
iotlabs/sensors/gateway1trên MQTT broker / IoTLabs Cloud.
6. Kiểm tra dữ liệu bằng MQTT Client
Sau khi nạp firmware cho gateway và những node cảm biến trước đó:
- Đảm bảo gateway đã kết nối WiFi và MQTT thành công (xem log Serial).
- Mở một MQTT client trên máy tính hoặc điện thoại, ví dụ:
- MQTTX
- MQTT Explorer
- Node-RED (node
mqtt in)
- Cấu hình:
- Host:
MQTT_SERVER - Port:
MQTT_PORT - User/Password nếu có
- Host:
- Subscribe đến topic:
iotlabs/sensors/gateway1 - Bạn sẽ thấy các payload JSON xuất hiện liên tục, ví dụ:
{"nodeId":1,"temperature":27.50,"humidity":61.20,"gas":12.30,"uptime":345,"timestamp":1710000123} {"nodeId":2,"temperature":29.10,"humidity":55.80,"gas":25.60,"uptime":210,"timestamp":1710000126}
Từ đây, bạn có thể:
- Lưu vào database (InfluxDB, MySQL,…).
- Vẽ biểu đồ trên Grafana.
- Tạo rule cảnh báo (notify Telegram, email,…).
7. Một số lưu ý & best practices
7.1. Bảo mật MQTT
- Demo này dùng MQTT không mã hóa (port 1883), phù hợp cho mạng LAN / lab.
- Khi triển khai thật, nên dùng MQTT over TLS (port 8883) + user/password hoặc token.
- IoTLabs Cloud có thể cung cấp MQTT TLS + ACL cho từng thiết bị / project.
7.2. Độ tin cậy khi publish
PubSubClientsử dụng QoS 0 (mặc định). Với dữ liệu realtime liên tục (sensor), QoS 0 thường đủ.- Nếu cần đảm bảo hơn, bạn có thể triển khai thêm cơ chế queue lại khi mất MQTT (lưu tạm trong RAM/Flash rồi gửi bù).
7.3. Tối ưu payload JSON
- Nếu băng thông hạn chế, có thể:
- Rút gọn key:
n,t,h,g,u,ts. - Sử dụng định dạng nhị phân riêng (nhưng JSON dễ debug hơn).
- Rút gọn key:
8. Bài tập mở rộng
8.1. Topic riêng cho từng node
- Thay vì 1 topic chung, bạn có thể publish theo:
char topic[64]; snprintf(topic, sizeof(topic), "iotlabs/sensors/gateway1/node/%u", packet.nodeId); mqttClient.publish(topic, payload); - Sau đó trên dashboard, bạn tách theo từng node dễ dàng hơn.
8.2. Thêm trạng thái gateway
- Định kỳ (ví dụ mỗi 30 giây), gateway publish thêm một topic health:
iotlabs/gateway1/statusPayload chứa:{"ip":"192.168.1.50","rssi":-62,"uptime":600}
8.3. Tích hợp Node-RED / Dashboard web
- Dùng Node-RED:
mqtt in→json→ui_gauge/ui_chartđể hiển thị nhiệt độ, độ ẩm, gas.
- Dùng web app riêng của IoTLabs:
- Backend subscribe MQTT.
- Lưu dữ liệu vào DB.
- Frontend (React/Vue) gọi API để hiển thị.
9. Kết luận & bước tiếp theo
Trong Phần 8 của series “Lập trình ESP32 38 Pin & NRF”, bạn đã:
- Biến ESP32 Gateway thành cầu nối giữa mạng NRF24L01 và MQTT / IoTLabs Cloud.
- Kết nối ESP32 với WiFi, MQTT broker.
- Đóng gói dữ liệu cảm biến từ nhiều node thành JSON và publish lên topic.
- Kiểm tra dữ liệu bằng các MQTT client và hình dung cách xây dựng dashboard.
Từ đây, bạn có thể dễ dàng:
- Tạo hệ thống giám sát môi trường online.
- Gửi cảnh báo qua Telegram / Zalo / email.
- Tích hợp với các dự án lớn hơn trong hệ sinh thái IoTLabs.
Ở các phần tiếp theo (gợi ý):
- Phần 9: Thiết kế dashboard web đơn giản hiển thị dữ liệu từ IoTLabs MQTT.
- Phần 10: Tối ưu năng lượng cho node cảm biến (Deep Sleep, pin, năng lượng mặt trời,…).
Hẹn gặp bạn trong những phần tiếp theo trên iotlabs.vn!