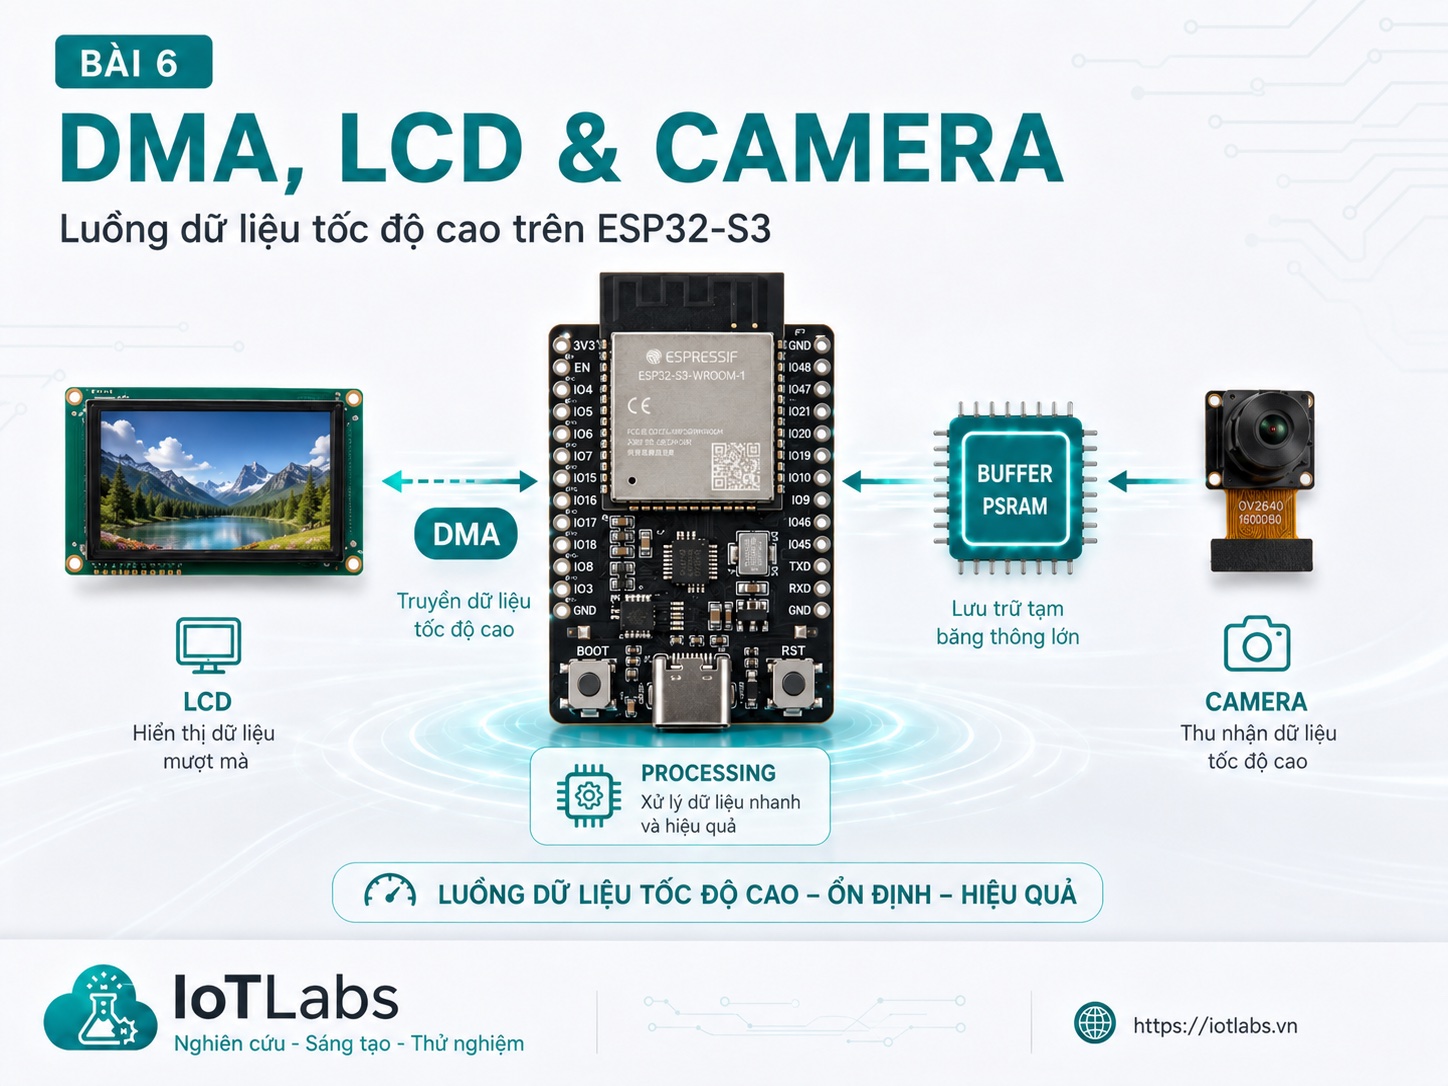
Vấn Đề: CPU Bận Truyền Data
Khi LCD update màn hình 30 lần/giây với 320×240 pixels, mỗi frame gồm 153.600 bytes cần truyền qua SPI. Nếu CPU tự ghi từng byte, nó phải làm công việc này:
320 × 240 × 2 bytes = 153.600 bytes × 30 fps = 4.608.000 bytes/giâyỞ tần số SPI 40 MHz, mỗi byte truyền ~0.2 µs → 30 ms/frame chỉ để truyền data. CPU bận toàn bộ thời gian đó, không làm được gì khác.
DMA (Direct Memory Access) giải quyết vấn đề này: một hardware controller chuyên dụng đảm nhận việc chuyển data từ bộ nhớ → SPI bus, trong khi CPU tự do làm việc khác.
DMA Là Gì?
DMA là hardware engine tích hợp trong SoC, có khả năng:
- Copy data từ RAM → peripheral (SPI TX, I2S TX, UART TX)
- Copy data từ peripheral → RAM (SPI RX, I2S RX, camera)
- Không cần CPU can thiệp trong quá trình transfer
Trên ESP32-S3, DMA controller hỗ trợ:
- SPI2 và SPI3: LCD, SD card, display modules
- I2S0 và I2S1: camera (CSI-style qua I2S), audio
- UART: DMA UART để không block CPU
- ADC: DMA ADC cho sampling liên tục
Không DMA:    CPU ─── loop ghi từng byte ──→ SPI → LCD
Với DMA:      CPU ─── setup descriptor ──→ DMA controller ─── transfer ──→ SPI → LCD
              CPU tự do làm việc khác trong khi DMA chạy
SPI DMA Cho LCD
Thư viện ArduinoGFX và TFTeSPI đều hỗ trợ DMA. Đây là cách dùng Arduino_GFX với DMA:
#include <Arduino_GFX_Library.h>

// Cấu hình SPI DMA cho ST7789 240×240
Arduino_DataBus* bus = create_default_Arduino_HWSPI(
    TFT_CS,   // Chip Select
    TFT_DC    // Data/Command
);
// Với DMA: dùng Arduino_ESP32SPI thay vì Arduino_HWSPI
// Arduino_DataBus* bus = new Arduino_ESP32SPI(TFT_DC, TFT_CS, SCK, MOSI, MISO,
//                                             VSPI, true);  // true = enable DMA

Arduino_GFX* gfx = new Arduino_ST7789(bus,
    TFT_RST,          // Reset pin
    0,                // Rotation
    true,             // IPS panel
    240, 240          // Width, height
);

void setup() {
    gfx->begin(40000000);  // 40 MHz SPI clock
}

void loop() {
    // DMA tự xử lý việc đẩy pixel — CPU không bị block
    gfx->fillScreen(BLACK);
    gfx->drawString("Hello ESP32-S3!", 10, 10, 2);
}
Framebuffer Approach
Cách hiệu quả hơn: render vào buffer PSRAM, sau đó DMA copy buffer lên LCD:
// Framebuffer trong PSRAM (320×240×2 = 150 KB)
uint16_t* framebuffer = (uint16_t*)ps_malloc(320 * 240 * 2);

void renderFrame() {
    // Render tất cả mọi thứ vào framebuffer trước
    for (int y = 0; y < 240; y++) {
        for (int x = 0; x < 320; x++) {
            framebuffer[y * 320 + x] = calculatePixelColor(x, y);
        }
    }
    // Rồi mới push lên LCD một lần qua DMA — nhanh, không bị tear
    gfx->draw16bitRGBBitmap(0, 0, framebuffer, 320, 240);
}
Double buffering (2 framebuffer) hoàn toàn loại bỏ screen tearing — trong khi DMA đang đẩy buffer A lên LCD, CPU render vào buffer B.
I2S DMA Cho Camera
ESP32-S3 hỗ trợ camera qua I2S parallel interface (8-bit hoặc 16-bit data bus). Thư viện esp32-camera từ Espressif sử dụng I2S DMA để capture frame không tốn CPU:
#include "esp_camera.h"

// Cấu hình camera (ESP32-S3-EYE hoặc board tương tự)
camera_config_t config = {
    .pin_pwdn     = -1,
    .pin_reset    = -1,
    .pin_xclk     = 15,
    .pin_sccb_sda = 4,
    .pin_sccb_scl = 5,

    // Data bus 8-bit
    .pin_d7 = 16, .pin_d6 = 17, .pin_d5 = 18, .pin_d4 = 12,
    .pin_d3 = 10, .pin_d2 = 8,  .pin_d1 = 9,  .pin_d0 = 11,

    .pin_vsync = 6,
    .pin_href  = 7,
    .pin_pclk  = 13,

    .xclk_freq_hz = 20000000,  // 20 MHz XCLK
    .ledc_timer   = LEDC_TIMER_0,
    .ledc_channel = LEDC_CHANNEL_0,

    .pixel_format = PIXFORMAT_JPEG,  // JPEG để tiết kiệm bandwidth
    .frame_size   = FRAMESIZE_VGA,   // 640×480

    // PSRAM cho frame buffer
    .jpeg_quality = 12,   // 0-63, thấp hơn = chất lượng cao hơn
    .fb_count     = 2,    // 2 frame buffer — double buffering
    .fb_location  = CAMERA_FB_IN_PSRAM,  // Frame buffer trong PSRAM
    .grab_mode    = CAMERA_GRAB_WHEN_EMPTY,
};

void setup() {
    esp_err_t err = esp_camera_init(&config);
    if (err != ESP_OK) {
        Serial.printf("Camera init failed: 0x%x\n", err);
        return;
    }
}

void captureAndProcess() {
    // Lấy frame — DMA đã capture xong, CPU chỉ cần lấy pointer
    camera_fb_t* fb = esp_camera_fb_get();
    if (!fb) {
        Serial.println("Frame capture failed");
        return;
    }

    Serial.printf("Frame: %zu bytes, %dx%d\n",
        fb->len, fb->width, fb->height);

    // Xử lý frame (gửi qua HTTP, phân tích AI, v.v.)
    processFrame(fb->buf, fb->len);

    // Trả frame buffer lại để DMA dùng lần tiếp
    esp_camera_fb_return(fb);
}
Pipeline Camera → LCD: Hiển Thị Real-Time
Pattern phổ biến: Camera capture → DMA → PSRAM buffer → DMA → LCD
// Task camera: chạy trên Core 0
void cameraTask(void* p) {
    while (true) {
        camera_fb_t* fb = esp_camera_fb_get();
        if (fb) {
            // Gửi pointer frame qua Queue (không copy data!)
            xQueueSend(frameQueue, &fb, pdMS_TO_TICKS(10));
        }
    }
}

// Task display: chạy trên Core 1
void displayTask(void* p) {
    camera_fb_t* fb;
    while (true) {
        if (xQueueReceive(frameQueue, &fb, pdMS_TO_TICKS(1000))) {
            // Convert JPEG → RGB và hiển thị
            // (dùng esp_jpg_decode hoặc thư viện tương tự)
            displayJpegFrame(fb->buf, fb->len);
            esp_camera_fb_return(fb);  // QUAN TRỌNG: trả buffer!
        }
    }
}
Chú ý: truyền pointer qua Queue, không copy frame data (hàng trăm KB) — tốn thời gian và bộ nhớ không cần thiết.
I2S DMA Cho Audio
ESP32-S3 có 2 I2S controller, cả 2 đều hỗ trợ DMA. Đây là cách capture audio từ microphone I2S MEMS:
#include <driver/i2s_std.h>

i2s_chan_handle_t rx_handle;

void setupMicI2S() {
    i2s_chan_config_t chan_cfg = I2S_CHANNEL_DEFAULT_CONFIG(
        I2S_NUM_0, I2S_ROLE_MASTER);
    i2s_new_channel(&chan_cfg, NULL, &rx_handle);

    i2s_std_config_t std_cfg = {
        .clk_cfg  = I2S_STD_CLK_DEFAULT_CONFIG(16000),  // 16 KHz sample rate
        .slot_cfg = I2S_STD_MSB_SLOT_DEFAULT_CONFIG(
            I2S_DATA_BIT_WIDTH_16BIT, I2S_SLOT_MODE_MONO),
        .gpio_cfg = {
            .mclk = I2S_GPIO_UNUSED,
            .bclk = GPIO_NUM_26,
            .ws   = GPIO_NUM_25,
            .dout = I2S_GPIO_UNUSED,
            .din  = GPIO_NUM_22,
        },
    };

    i2s_channel_init_std_mode(rx_handle, &std_cfg);
    i2s_channel_enable(rx_handle);
}

void captureAudio() {
    int16_t samples[512];
    size_t bytesRead;

    // DMA đã capture sẵn — CPU chỉ đọc từ buffer
    i2s_channel_read(rx_handle, samples, sizeof(samples), &bytesRead, pdMS_TO_TICKS(100));

    // Xử lý audio: FFT, VAD, wake word detection, v.v.
    processAudioSamples(samples, bytesRead / sizeof(int16_t));
}
Tổng Kết
| Giao Tiếp | DMA Support | Dùng Cho | Lưu Ý |
|---|---|---|---|
| SPI (VSPI/HSPI) | Có | LCD, SD card | Buffer phải DMA-capable |
| I2S parallel | Có | Camera OV2640/OV5640 | Cần 8 data pins |
| I2S serial | Có | Microphone, DAC audio | 3 pins (BCLK, WS, DATA) |
| UART | Có | High-speed serial | Ít dùng DMA |
| I2C | Không | Sensor, LCD nhỏ | Không DMA, dùng interrupt |
Bài tiếp theo: Bài 7 — USB OTG Trên ESP32-S3: Device, Host, CDC, HID và Ứng Dụng Thực Tế — ESP32-S3 làm USB device (CDC, HID) và USB host, phân biệt USB native vs USB-UART.
📚 Series: Sức Mạnh ESP32-S3 Dual-Core
⬅️ Bài trước: S3 Dual-Core – Bài 5: Memory Architecture – SRAM, PSRAM, Flash, Heap
➡️ Bài tiếp theo: S3 Dual-Core – Bài 7: USB OTG – Device, Host, CDC, HID